If you’re tired of Siri interrupting your music or podcasts to read out every single message that comes in, you’re in luck. In this step-by-step guide, we’ll show you how to stop Siri from reading messages on your AirPods.
By disabling the ‘Announce Messages’ feature and adjusting your notification settings, you can regain control over your listening experience.
First, you’ll need to connect your AirPods to your device. Once they’re paired, access the Siri settings on your device to make the necessary changes. We’ll walk you through the process of disabling the ‘Announce Messages’ feature, which is responsible for Siri’s interruptions.
Next, we’ll show you how to adjust your notification settings so that you still receive message notifications, but Siri won’t read them aloud.
Finally, we’ll guide you through testing the changes and troubleshooting any common issues that may arise.
With this step-by-step guide, you’ll be able to enjoy your music and podcasts without Siri constantly chiming in with message announcements.
Let’s get started!
Key Takeaways
- Disable the ‘Announce Messages’ feature in Siri settings to stop Siri from interrupting music or podcasts on AirPods.
- Connect AirPods to the device by opening the lid of the AirPods case, ensuring AirPods are inside, and turning on Bluetooth in the Control Center.
- Adjust notification settings to have more control over notifications and prevent Siri from reading messages on AirPods.
- Troubleshoot common issues by ensuring AirPods are connected and selected as the audio output device, and reset AirPods if necessary.
Connecting Your AirPods to Your Device
To connect your AirPods to your device, first, you’ll need to open the lid of your AirPods case. Once the lid is open, make sure your AirPods are inside the case and close to your device.
Next, unlock your device and go to the home screen. Swipe down from the top-right corner of the screen to open the Control Center. Look for the Bluetooth icon and tap on it to turn it on.
After turning on Bluetooth, a list of available devices will appear. Locate your AirPods from the list and tap on them to connect. You’ll see a prompt asking you to confirm the connection. Tap ‘Connect’ and your AirPods will be successfully connected to your device.
Accessing Siri Settings
Start by accessing the settings on your device to customize how Siri interacts with your AirPods. To do this, open the Settings app on your iPhone or iPad.
Scroll down and tap on Siri & Search.
Next, you’ll see a list of options related to Siri. Tap on the option that says ‘Siri & Dictation on AirPods.’
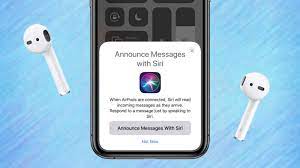
Here, you can choose whether you want Siri to read messages aloud on your AirPods or not. If you want to disable this feature, simply toggle off the switch next to ‘Announce Messages with Siri.’
You can also customize other Siri settings here, such as enabling or disabling Siri’s voice feedback or allowing Siri when locked.
Once you’re done making your changes, simply exit the Settings app, and Siri will no longer read messages on your AirPods.
Disabling the “Announce Messages” Feature
By toggling off the switch for ‘Announce Messages with Siri’, you can easily disable the feature that allows Siri to audibly announce incoming messages on your AirPods.
To do this, first, open the Settings app on your iPhone or iPad. Then, scroll down and tap on ‘Siri & Search’.
Next, look for the ‘Announce Messages with Siri’ option and tap on it. Finally, toggle off the switch next to ‘Announce Messages with Siri’.
Once you’ve completed these steps, Siri won’t read your messages out loud through your AirPods anymore.
This can be useful if you prefer to keep your messages private or if you find the feature distracting.
Adjusting Notification Settings
One important aspect to consider is customizing how notifications are displayed on your device. To adjust notification settings, open the Settings app on your iPhone.
Scroll down and tap on ‘Notifications.’ Here, you can see a list of all the apps installed on your device. Tap on the app for which you want to adjust the notification settings.
From here, you can toggle the ‘Allow Notifications’ switch on or off to enable or disable notifications for that particular app. You can also customize the alert style, whether it’s banners or alerts, and choose whether or not to show notifications on the lock screen.
By adjusting these settings, you can have more control over how notifications are displayed and prevent Siri from reading messages on your AirPods.
Testing the Changes
Now that you’ve made these adjustments, let’s see how the changes affect your iPhone’s notifications.
The first thing you should do is test a message notification while wearing your AirPods. Make sure your AirPods are connected to your iPhone and that Siri is enabled.
Ask someone to send you a message and wait for the notification to come through. If Siri still reads the message out loud, go back to the Notification Settings and double-check that you’ve disabled the ‘Announce Messages with Siri’ option for both the Lock Screen and Headphones.
Repeat the test to see if the changes have taken effect. If Siri no longer reads the messages aloud, congratulations! You’ve successfully stopped Siri from reading messages on your AirPods.
Enjoy your uninterrupted listening experience!
Troubleshooting Common Issues
To address any potential difficulties, it’s important to troubleshoot common issues that may arise during this process.
If you’re having trouble stopping Siri from reading messages on your AirPods, there are a few things you can try.
First, make sure that your AirPods are connected to your iPhone or iPad. Check if the AirPods are selected as the audio output device in your device’s settings.
If they are, but Siri still reads messages, try resetting your AirPods by putting them back in their case and holding the setup button on the back until the status light flashes white.
If all else fails, you can try disabling Siri completely by going to Settings, selecting Siri & Search, and toggling off the ‘Listen for Hey Siri’ option.
Frequently Asked Questions
Yes, you can stop Siri from reading messages on your AirPods without disconnecting them. Simply go to your device’s settings, select Siri & Search, and turn off the “Read Messages” option.
No, it is not possible to disable the ‘announce messages’ feature only for specific contacts. The ‘announce messages’ feature is a global setting that applies to all contacts when enabled.
Disabling the ‘announce messages’ feature will not affect Siri’s ability to read messages aloud on your iPhone. It only stops Siri from announcing messages through your AirPods.
To adjust the volume of Siri’s message announcements on your AirPods, you can use the volume buttons on your iPhone or ask Siri to increase or decrease the volume.
If Siri still reads messages on your AirPods after following all the steps, try restarting your iPhone and AirPods. If the issue persists, check if you have enabled the Announce Messages with Siri feature.
Conclusion
So there you have it! By following these simple steps, you can easily stop Siri from reading messages on your AirPods.
First, connect your AirPods to your device.
Then, access Siri settings and disable the ‘Announce Messages’ feature.
After that, adjust your notification settings to your preference.
Finally, test the changes to ensure Siri no longer reads your messages.
If you encounter any issues, refer to the troubleshooting section.
Enjoy your message-free AirPods experience!


